添加导航
本指南基于入门教程的第一步:基本 Angular 应用入门。
在此阶段,本在线商店应用会拥有基本的产品目录。
在以下各节中,你将向应用添加以下功能:
- 在地址栏中键入 URL 以导航到相应的产品页面。
- 单击页面上的链接以在单页应用中导航。
- 单击浏览器的后退和前进按钮以直观地在浏览器的历史记录中浏览。
关联 URL 路径与组件
本应用已经用 Angular Router 导航到了 ProductListComponent。本节将介绍如何定义显示单个产品详情的路由。
- 生成用于展示产品详情的新组件。在终端窗口运行如下命令来生成一个新的
product-details 组件:
- 生成用于展示产品详情的新组件。在终端窗口运行如下命令来生成一个新的
ng generate component product-details- 在
app.module.ts 中,添加产品详情的路由,其 path为 products/:productId,其 component为 ProductDetailsComponent。
- 在
@NgModule({
  imports: [
    BrowserModule,
    ReactiveFormsModule,
    RouterModule.forRoot([
      { path: , component: ProductListComponent },
      { path: products/:productId, component: ProductDetailsComponent },
    ])
  ],
  declarations: [
    AppComponent,
    TopBarComponent,
    ProductListComponent,
    ProductAlertsComponent,
    ProductDetailsComponent,
],- 打开
product-list.component.html。 - 修改产品名称上的链接,使其包括以
product.id 为参数的 routerLink。
- 打开
<div *ngFor="let product of products">

  <h3>
    <a
      [title]="product.name +  details"
      [routerLink]="[/products, product.id]">
      {{ product.name }}
    </a>
  </h3>

  <!-- . . . -->

</div>RouterLink 指令可帮助你自定义 a 元素。在这里,路由或 URL 中包含一个固定的区段 /products。最后一段则是变量,插入当前产品的 id。 例如,id 为 1 的产品的 URL 是 https://getting-started-myfork.stackblitz.io/products/1。
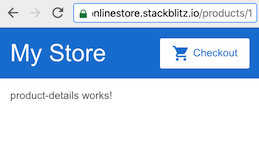
- 通过单击产品名称,验证路由器是否如预期般工作。应用中应该显示
ProductDetailsComponent组件,其显示的内容为 “product-details works!”。
- 通过单击产品名称,验证路由器是否如预期般工作。应用中应该显示
请注意,预览窗口中的 URL 发生了变化。最后一个部分是 products/#,其中 # 表示你单击的路由的编号。

查看产品详情
ProductDetailsComponent 会处理每个产品的显示工作。Angular 路由器会根据浏览器的 URL 和你定义的路径来显示组件。
在本节中,你将使用 Angular 路由器来组合 products 数据和路由信息以显示每个产品的特定详情。
- 在
product-details.component.ts 中,从 @angular/router 导入 ActivatedRoute,并从 ../products 导入 products数组。
- 在
import { Component, OnInit } from @angular/core;
import { ActivatedRoute } from @angular/router;

import { Product, products } from ../products;- 定义
product属性。
- 定义
export class ProductDetailsComponent implements OnInit {

  product: Product | undefined;
  /* ... */
}- 通过把
private route: ActivatedRoute 添加为构造函数括号内的参数,来把 ActivatedRoute注入到 constructor() 中。
- 通过把
export class ProductDetailsComponent implements OnInit {

  product: Product | undefined;

  constructor(private route: ActivatedRoute) { }

}
Angular 路由器加载的每个组件都有自己专属的 ActivatedRoute。ActivatedRoute 中包含有关路由和路由参数的信息。
通过注入 ActivatedRoute,你可以配置此组件以使用服务。
- 在
ngOnInit() 方法中,从路由参数中提取 productId,并在 products数组中找到相应的产品。
- 在
ngOnInit() {
  // First get the product id from the current route.
  const routeParams = this.route.snapshot.paramMap;
  const productIdFromRoute = Number(routeParams.get(productId));

  // Find the product that correspond with the id provided in route.
  this.product = products.find(product => product.id === productIdFromRoute);
}
路由参数与你在此路由中定义的路径变量相对应。要访问路由参数,我们使用 route.snapshot ,它是一个 ActivatedRouteSnapshot,其中包含有关该特定时刻的活动路由信息。与此路由匹配的 URL 提供了 productId。Angular 会使用 productId 来显示每个唯一产品的详情。
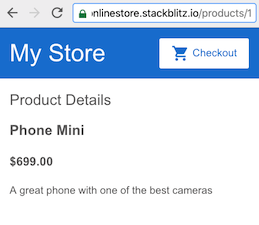
- 更新
ProductDetailsComponent的模板以显示带有 *ngIf的产品详情。如果产品存在,则此 <div> 会显示名称、价格和说明。
- 更新
<h2>Product Details</h2>

<div *ngIf="product">
  <h3>{{ product.name }}</h3>
  <h4>{{ product.price | currency }}</h4>
  <p>{{ product.description }}</p>
</div><h4>{{ product.price | currency }}</h4> 这一行,使用 currency 管道将 product.price 从数字转换为货币字符串。管道是一种可以在 HTML 模板中转换数据的方式。
- 当用户单击产品列表中的名称时,路由器会将其导航到产品的不同 URL,显示此
ProductDetailsComponent,并展示产品详情。
- 当用户单击产品列表中的名称时,路由器会将其导航到产品的不同 URL,显示此
作者:terry,如若转载,请注明出处:https://www.web176.com/angular13/24165.html
 支付宝
支付宝  微信
微信