准备从 AngularJS 升级
注意:本指南仅仅适用于从 AngularJS 升级和注重性能的升级。 本指南中提到的升级指南使用的是已弃用的快速上手 Github 仓库,它是在 Angular CLI 推出之前创建的。
对于所有其它场景,请参阅建立本地开发环境中的步骤。
本指南讲的是如何在你自己的机器上进行本地化开发。 利用 github 上的《快速上手》种子在你的电脑上搭建一个新项目是很快很容易的。
前提条件:确保你已经安装好了 Node.js 和 npm。
克隆
运行下列命令来执行克隆并启动步骤。
git clone https://github.com/angular/quickstart.git quickstart
cd quickstart
npm install
下载
下载《快速上手》种子 并解压到你的项目目录中。然后执行下面的命令完成剩余步骤。
cd quickstart
npm install
删除非必需文件(可选)
你可以快速删除一些涉及到测试和维护快速开始版本库的 非必需 文件 (包括所有 git 相关的文件如 .git 文件夹和 .gitignore!)。
请只在开始时执行此删除操作,以防你自己的测试和 git 文件被意外删除!
在项目目录下打开一个终端窗口,并根据你的操作系统执行以下命令:
OS/X (bash)
xargs rm -rf < non-essential-files.osx.txt
rm src/app/*.spec*.ts
rm non-essential-files.osx.txt
Windows
for /f %i in (non-essential-files.txt) do del %i /F /S /Q
rd .git /s /q
rd e2e /s /q
更新依赖版本
由于不推荐使用快速入门仓库(它已不再更新),所以你需要一些额外的步骤来使用最新的 Angular。
- 删除过时的
@angular/http 包(全都来自 package.json > dependencies 和 src/systemjs.config.js > SystemJS.config() > map )。 - 通过运行以下命令来安装最新版本的 Angular 框架包:
- 通过运行以下命令安装 Angular 用到的其它包的最新版本(RxJS、TypeScript、Zone.js):
- 安装
systemjs-plugin-babel 包。稍后它将用于使用 SystemJS 加载 ES2015 格式的 Angular 框架文件。 - 为了能正确加载最新的 Angular 框架包(ES2015 格式),请替换
src/systemjs.config.js 中的相关条目: - 为了能够正确加载最新的 RxJS 包,请替换
src/systemjs.config.js 中的相关条目: - 为了能够加载
tslib包(这是由 TypeScript 转译后的文件所必需的),请将以下条目添加到 src/systemjs.config.js : - 为了使 SystemJS 能够正确加载 ES2015 Angular 文件,请将以下条目添加到
src/systemjs.config.js : - 最后,为了防止依赖项的 TypeScript 类型检查错误,请将以下条目添加到
src/tsconfig.json :
npm install --save @angular/common@latest @angular/compiler@latest @angular/core@latest @angular/forms@latest @angular/platform-browser@latest @angular/platform-browser-dynamic@latest @angular/router@latestnpm install --save rxjs@latest zone.js@latest
npm install --save-dev typescript@latestnpm install --save systemjs-plugin-babel@latestSystem.config({
/* . . . */
map: {
/* . . . */
@angular/core: npm:@angular/core/fesm2015/core.mjs,
@angular/common: npm:@angular/common/fesm2015/common.mjs,
@angular/common/http: npm:@angular/common/fesm2015/http.mjs,
@angular/compiler: npm:@angular/compiler/fesm2015/compiler.mjs,
@angular/platform-browser: npm:@angular/platform-browser/fesm2015/platform-browser.mjs,
@angular/platform-browser-dynamic: npm:@angular/platform-browser-dynamic/fesm2015/platform-browser-dynamic.mjs,
@angular/router: npm:@angular/router/fesm2015/router.mjs,
@angular/router/upgrade: npm:@angular/router/fesm2015/upgrade.mjs,
@angular/forms: npm:@angular/forms/fesm2015/forms.mjs,
/* . . . */
},
/* . . . */
});System.config({
/* . . . */
map: {
/* . . . */
rxjs: npm:rxjs/dist/cjs,
rxjs/operators: npm:rxjs/dist/cjs/operators,
/* . . . */
},
/* . . . */
packages: {
/* . . . */
rxjs: {
defaultExtension: js,
format: cjs,
main: index.js
},
rxjs/operators: {
defaultExtension: js,
format: cjs,
main: index.js
},
/* . . . */
}
});System.config({
/* . . . */
map: {
/* . . . */
tslib: npm:tslib/tslib.js,
/* . . . */
},
/* . . . */
});System.config({
/* . . . */
map: {
/* . . . */
plugin-babel: npm:systemjs-plugin-babel/plugin-babel.js,
systemjs-babel-build: npm:systemjs-plugin-babel/systemjs-babel-browser.js
},
transpiler: plugin-babel,
/* . . . */
packages: {
/* . . . */
meta: {
*.mjs: {
babelOptions: {
es2015: false
}
}
}
}
});{
"compilerOptions": {
"skipLibCheck": true,
// ...
}
}有了这些,你现在就可以运行 npm start 并构建和启动应用程序了。构建后,应用程序将自动在新的浏览器选项卡中打开,并在你更改源代码时自动重新加载。
《快速上手》种子库里都有什么?
《快速上手》种子 提供了一个基本的《快速上手》游乐场应用,以及进行本地开发的其它必要文件。
提醒:“快速上手”种子项目是在 Angular CLI 之前创建的,因此这里讲的会和 Angular CLI 创建的应用有一些差异。
注意/src目录中以下三个 TypeScript (.ts) 文件:
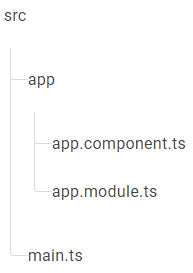

- src/app/app.component.ts
import { Component } from @angular/core;

@Component({
  selector: app-root,
  template: <h1>Hello {{name}}</h1>
})
export class AppComponent { name = Angular; }import { NgModule } from @angular/core;
import { BrowserModule } from @angular/platform-browser;
import { AppComponent } from ./app.component;
@NgModule({
imports: [ BrowserModule ],
declarations: [ AppComponent ],
bootstrap: [ AppComponent ]
})
export class AppModule { }import { platformBrowserDynamic } from @angular/platform-browser-dynamic;
import { AppModule } from ./app/app.module;
platformBrowserDynamic().bootstrapModule(AppModule);所有指南和烹饪书都至少有这几个核心文件。每个文件都有独特的用途,并且随着应用的成长各自独立演变。
src/ 目录之外的文件为构建、部署和测试 app 相关的文件,他们只包括配置文件和外部依赖。
src/ 目录下的文件才“属于”你的 app。 除非明确指出,否则教程中添加的 TypeScript,HTML 和 CSS 文件都在 src/ 目录下, 大多数在 src/app 目录中。
src/ 目录文件详情如下:
文件 | 用途 |
|---|---|
| 定义与《快速上手》游乐场同样的 |
| 定义 |
| 使即时 (JIT) 编译器用编译应用并且在浏览器中启动并运行应用。 对于大多数项目的开发,这都是合理的选择。而且它是在像 Stackblitz 这样的在线编程环境中运行例子的唯一选择。 你将在本文档中学习其它编译和开发选择。 |
附录:使用 fakeAsync()/waitForAsync() 进行测试
如果你使用 fakeAsync()/async() 辅助函数来运行单元测试,就要在测试的准备文件中导入 zone.js/testing。
如果你是用
Angular/CLI 创建的项目,那么它已经在 src/test.ts 中导入过了。
在以前版本的 Angular 中,下列文件曾被导入或添加到 html 文件中:
import zone.js/plugins/long-stack-trace-zone;
import zone.js/plugins/proxy;
import zone.js/plugins/sync-test;
import zone.js/plugins/jasmine-patch;
import zone.js/plugins/async-test;
import zone.js/plugins/fake-async-test;
你仍然可以分别导入这些文件,不过导入顺序很重要,你必须在 sync-test、async-test、fake-async-test 和 jasmine-patch 之前导入 proxy。还要注意在 jasmine-patch 之前导入 sync-test。所以,建议你只导入 zone-testing 而不要分别加载那些文件。
作者:唐伯虎点蚊香,如若转载,请注明出处:https://www.web176.com/angular13/24042.html
 支付宝
支付宝  微信
微信