Polymer elements是一组视觉和非视觉元素,旨在与布局,用户交互,选择和脚手架应用程序一起使用。其中包括从简单的按钮到具有整洁视觉效果的对话框的所有内容。下表显示了不同类型的Polymer elements。
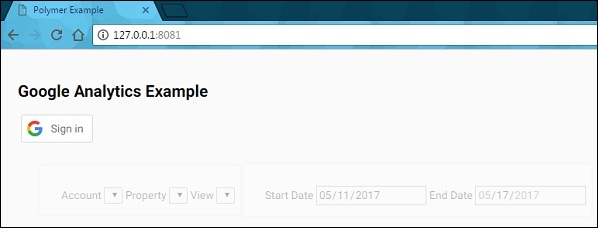
Google Analytics Query
Google Analytics(分析)是Google Web组件的一个元素,用于查询Google Analytics(分析)Core Reporting API。
您可以通过运行以下命令在应用程序中使用此元素,以将其安装在项目目录中。
bower install --save GoogleWebComponents/google-analytics
例子
以下示例指定了Polymer.js中google-analytics元素的用法。创建一个index.html文件,并在其中添加以下代码。
<!doctype html>
<html>
   <head>
      <title>Polymer Example</title>
      <script src = "bower_components/webcomponentsjs/webcomponents-lite.js"></script>
      <link rel = "import" href = "bower_components/polymer/polymer.html">
      <link rel = "import" href = "bower_components/paper-styles/demo-pages.html">
      <link rel = "import" href = "bower_components/google-signin/google-signin.html">
      <link rel = "import" href = "bower_components/google-analytics/google-analytics.html">

      <style>
         google-analytics-dashboard {
            display: block;
            padding: 2em;
            transition: opacity .2s ease;
         }
         google-analytics-dashboard:not([authorized]) {
            opacity: .3;
            pointer-events: none;
         }
         google-analytics-chart {
            box-shadow: 0 0 .5em rgba(0,0,0,.1);
            background: #fff;
            float: left;
            margin: 0 2em 2em 0;
            padding: 2em 2em 1em;
            transition: opacity .2s ease;
            max-width: 100%;
         }
         google-analytics-view-selector, google-analytics-date-selector {
            box-shadow: 0 0 .5em rgba(0,0,0,.1);
            background: #fff;
            display: -webkit-flex;
            display: -ms-flexbox;
            display: flex;
            -webkit-flex-direction: column;
            -ms-flex-direction: column;
            flex-direction: column;
            margin: 0 0 2em 0;
            max-width: 600px;
            padding: 2em .5em 1em 2em;
         }
         google-analytics-date-selector {
            max-width: 500px;
         }
         google-analytics-view-selector {
            max-width: 750px;
         }
         :root {
            --google-analytics-control: {
               display: block;
               -webkit-flex: 1 1 0%;
               -ms-flex: 1 1 0%;
               flex: 1 1 0%;
               margin: 0 1.5em 1em 0;
               min-width: 0;
            };
            --google-analytics-label: {
               display: block;
               font-weight: bold;
               padding: 0 0 .4em 2px;
            };
            --google-analytics-field: {
               border: 1px solid #ccc;
               border-radius: 4px;
               box-sizing: border-box;
               height: 34px;
               line-height: 20px;
               padding: 6px 12px;
               transition: border-color .2s;
               width: 100%;
            };
            --google-analytics-field-focus: {
               border-color: #4d90fe;
               outline: 0;
            };
         }
         google-analytics-view-selector {
            --google-analytics-view-selector-control:
               var(--google-analytics-control);

            --google-analytics-view-selector-label:
               var(--google-analytics-label);

            --google-analytics-view-selector-select:
               var(--google-analytics-field);

            --google-analytics-view-selector-select-focus:
               var(--google-analytics-field-focus);
         }
         google-analytics-date-selector {
            --google-analytics-date-selector-control:
               var(--google-analytics-control);

            --google-analytics-date-selector-label:
               var(--google-analytics-label);

            --google-analytics-date-selector-input:
               var(--google-analytics-field);

            --google-analytics-date-selector-input-focus:
               var(--google-analytics-field-focus);
         }
      </style>
   </head>

   <body>
      <h2>Google Analytics Example</h2>
      <google-signin></google-signin>

      <google-analytics-dashboard>
         <google-analytics-view-selector></google-analytics-view-selector>
         <google-analytics-date-selector></google-analytics-date-selector>

         <google-analytics-chart
            type = "pie"
            metrics = "ga:pageviews"
            dimensions = "ga:browser"
            sort = "-ga:pageviews"
            max-results = "5">
            <h3>Pageviews by Browser</h3>
         </google-analytics-chart>
      </google-analytics-dashboard>
   </body>
</html>
输出
要运行该应用程序,请导航到创建的项目目录并运行以下命令。
polymer serve

Google Client Loader
要加载特定的客户端,请使用带有JavaScript客户端库Google-client-loader的Google API。
您可以通过运行以下命令在应用程序中使用polymer_google-client-loader,将其安装在项目目录中。
bower install --save GoogleWebComponents/google-apis
此命令将在bower_components文件夹下安装polymer_google-client-loader的所有相关元素。
例子
以下示例指定在Polymer.js中使用polymer_google-client-loader。创建一个index.html文件,并在其中添加以下代码。
<html>
   <head>
      <script src = "bower_components/webcomponentsjs/webcomponents-lite.js"></script>
      <link rel = "import" href = "bower_components/google-apis/google-apis.html">
   </head>

   <body>
      <div id = "loadedmsg"></div>
      <template  id = "googleclient" is = "dom-bind">
         <google-client-loader id = "shortener"
            name = "urlshortener"
            version = "v1"
            on-google-api-load = "loadedShortener">
         </google-client-loader>

         <google-js-api
            on-js-api-load = "msgloaded">
         </google-js-api>

         <google-plusone-api
            on-api-load = "msgloaded">
         </google-plusone-api>
      </template>

      <script>
         var googleclient = document.querySelector('#googleclient');
         googleclient.loadedShortener  = function(event) {
            var request = event.target.api.url.get ({
               shortUrl: 'http://goo.gl/fbsS'
            })
            request.execute(function(resp) {
            });
         };
         googleclient.msgloaded = function(e) {
            document.querySelector('#loadedmsg').innerHTML +=
               e.target.localName + ' is loaded' + '<br>';
         };
      </script>
   </body>
</html>
Google Chart
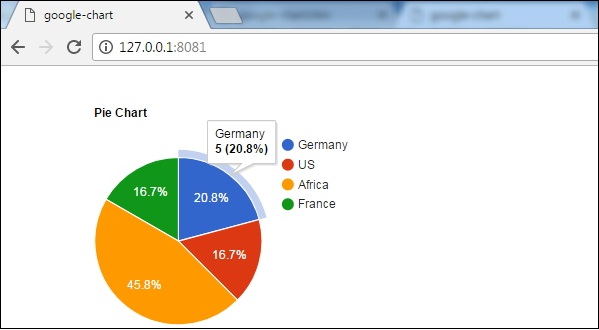
<google-chart>是包含用于可视化数据的图表的元素。此元素包含各种图表,例如饼图,折线图,柱形图,面积图,树形图等。
注意-对于有效的JSON,如果要将JSON作为属性传递,则必须使用单引号。
您可以将height和width指定为样式属性,如下所示-
google-chart {
   height: 100px;
   width: 300px;
}
您可以使用以下任何一种方式提供数据-
- 使用cols和rows属性。
cols = '[{"label":"Month", "type":"string"}, {"label":"Days", "type":"number"}]'
rows = '[["Oct", 31],["Nov", 30],["Dec", 31]]'
- 使用data属性,您可以直接传递数据。
data = '[["Month", "Days"], ["Oct", 31], ["Nov", 30], ["Dec", 31]]'
- 使用data属性,可以在URL中传递数据。
data = 'http://demo.com/chart-data.json'
- 使用data属性,您可以在Google DataTable对象中传递数据
data = '{{dataTable}}'
- 使用视图属性
view = '{{dataView}}'
如果要在“ en”以外的语言环境中显示图表,则可以在html标记上设置lang属性,如以下代码段所示。
<html lang = "ja">
例子
要使用google-chart元素,请在命令提示符下导航到您的项目文件夹,然后使用以下命令。
bower install PolymerElements/google-chart --save
上面的命令将google-chart元素安装在bower_components文件夹中。接下来,使用以下命令将google-chart文件导入index.html中。
<link rel = "import" href = "/bower_components/google-chart/google-chart.html">
以下示例演示了google-chart元素的用法。
<!DOCTYPE html>
<html>
   <head>
      <title>google-chart</title>
      <base href = "http://polygit.org/components/">
      <script src = "webcomponentsjs/webcomponents-lite.min.js"></script>
      <link rel = "import" href = "google-chart/google-chart.html">
   </head>

   <body>
      <google-chart
         type = 'pie'
         options = '{"title": "Pie Chart", "vAxis": {"minValue" : 0, "maxValue": 8}}'
         cols = '[{"label": "Country", "type": "string"},{"label": "Value", "type": "number"}]'
         rows = '[["Germany", 5.0],["US", 4.0],["Africa", 11.0],["France", 4.0]]'>
      </google-chart>
   </body>
</html>
输出
要运行该应用程序,请导航到您的项目目录并运行以下命令。
polymer serve
现在打开浏览器并导航到http://127.0.0.1:8081/。以下将是输出。
Google Hangout Button
Google Hangouts是Google Web组件的一个元素,它使跨不同设备的其他人进行对话。
您可以通过运行以下命令在应用程序中使用此元素,以将其安装在项目目录中。
bower install --save GoogleWebComponents/google-hangout-button
例子
以下示例指定在Polymer.js中使用google-hangout按钮元素。创建一个index.html文件,并在其中添加以下代码。
<!doctype html>
<html>
   <head>
      <title>Polymer Example</title>
      <script src="bower_components/webcomponentsjs/webcomponents-lite.js"></script>
      <link rel = "import" href = "bower_components/polymer/polymer.html">
      <link rel = "import" href = "bower_components/paper-styles/demo-pages.html">
      <link rel = "import"
         href = "bower_components/google-hangout-button/google-hangout-button.html">
      <link rel = "import"
         href = "bower_components/iron-flex-layout/classes/iron-flex-layout.html">

      <style>
         section {
            max-width: 300px;
         }
         section > div {
            padding: 5px;
         }
      </style>
   </head>

   <body>
      <section>
         <div class = "layout horizontal center">
            <span class = "flex">Default button</span>
            <span class = "flex"><google-hangout-button></google-hangout-button></span>
         </div>

         <div class = "layout horizontal center">
            <span class = "flex">Narrow button</span>
            <span class = "flex">
               <google-hangout-button width = "70"></google-hangout-button>
            </span>
         </div>
      </section>
   </body>
</html>
输出
要运行该应用程序,请导航到创建的项目目录并运行以下命令。
polymer serve
Google Map
<google-map>是用于显示google地图的元素。
<google-map latitude = "17.77591" longitude = "-524.41144" api-key = "4586"></google-map>
要显示startAddress和endAddress之间的地图方向,可以使用googlemap-directions,如以下代码所示-
<google-map-directions map="[map]"
   start-address = "United States" end-address = "Mountain View">
</google-map-directions>
例子
要使用google-map元素,请在命令提示符下导航到您的项目文件夹,然后使用以下命令:
bower install PolymerElements/google-map --save
上面的命令将google-map元素安装在bower_components文件夹中。接下来,使用以下命令将google-map文件导入到index.html中。
<link rel = "import" href = "/bower_components/google-map/google-map.html">
以下示例演示了google-map元素的用法。
<!DOCTYPE html>
<html>
   <head>
      <title>google-map</title>
      <meta name = "viewport" content = "width = device-width, initial-scale = 1">
      <script src = "bower_components/webcomponentsjs/webcomponents-lite.min.js"></script>
      <link rel = "import"
         href = "https://rawgit.com/Download/polymer/cdn/master/lib/google-map/google-map.html">

      <style>
         google-map {
            height: 250px;
            width: 380px;
            border: 2px solid black;
            margin: 25px 20px 20px 20px;
         }
      </style>
   </head>

   <body>
      <h2>Google-Map Example</h2>
      <demo-map></demo-map>
      <dom-module id = "demo-map">
         <template>
            <google-map map = "{{map}}" latitude = "37.779" longitude = "-122.3892">
            </google-map>
         </template>
      </dom-module>

      <script>
         Polymer ({
            is: "demo-map", properties: {
               Address: {
                  type: String, value: "San Francisco"
               }, map: "demo-map"
            }
         });
      </script>
  </body>
</html>
Google Signin
<google-signin>是用于Google身份验证的元素,您可以在其中与Drive和Google+ API进行交互。注意-您需要先在Google Developers Console中启用API,然后才能使用它们。
<google-signin client-id = "Your client id"
   scopes = "https://www.googleapis.com/auth/drive"></google-signin>

<google-signin label-signin = "Sign-in" client-id = "Your client id"
   scopes = "https://www.googleapis.com/auth/drive"></google-signin>

<google-signin theme = "dark" width = "iconOnly" client-id = "Your client id"
   scopes = "https://www.googleapis.com/auth/drive"></google-signin>
一些属性如下-
- clientId-您可以在Google Developers Console中获取clientId。
- 范围-此属性定义必要的范围权限。
- requestVisibleActions-您可以使用此属性代表用户编写应用程序活动(https://developers.google.com/+/web/app-activities/)。
- 离线-使用此属性,您可以获取服务器的身份验证代码,以保存以获取离线访问令牌(https://developers.google.com/identity/sign-in/web/server-side-flow)。
使用高度,宽度和主题属性来设置按钮的样式,从而可以遵循Google+登录按钮的品牌指南(https://developers.google.com/+/branding-guidelines)。
事件如下:
- google-signin-success-成功验证用户身份后,将触发此事件。通过使用isAuthorized属性,您可以注意到用户的身份验证状态。
- google- sign – out-用户注销时触发此事件。
- google-signout-attempted-用户尝试注销时触发此事件。
- google-signin-offline-success-用户尝试注销时触发此事件。
- google-signin-necessary-通过google-signin-aware元素请求的范围需要其他用户权限时,将触发此事件。
Google Streetview Pano
<google-streetview-pano>是用于显示街景全景图的元素。
例子
<google-streetview-pano
   pano-id = "CWskcsTEZBNXaD8gG-zATA"
   heading = "151"
   pitch = "-4"
   zoom = "0.6"
   disable-default-ui>
</google-streetview-pano>
您还可以将位置属性设置为具有计算值的位置,如以下代码所示。
<google-streetview-pano
   position = "[[_myComputedPosition()]]"
   heading = "151"
   pitch = "-4"
   zoom = "0.6"
   disable-default-ui>
</google-streetview-pano>
有很多panorams的可在谷歌地图| 视图页面。通过在地址栏中查看其网址,通过ID来获取全景图,如下所示-
google.com/maps/views/view/102684927602131521305/photo/1szTnskrdKIAAAGuu3fZRw
在上面的网址中,以粗体显示的哈希是pano-id。
Google Youtube
<google-youtube>是包含YouTube视频播放器的元素。
<google-youtube
   video-id = "....."
   height = "300px"
   width = "300px"
   rel = "0"
   start = "2"
   autoplay = "1">
</google-youtube>
google-youtube支持所有嵌入式播放器参数,您可以将每个参数设置为google-youtube的属性。
作者:terry,如若转载,请注明出处:https://www.web176.com/polymer/2319.html
 支付宝
支付宝  微信
微信