在当今的环境中,您可以使用多个选项来创建Web服务应用程序。您可以使用几种标准且广泛接受的协议中的一种或多种进行通信。例如SOAP,XML / HTTP,RESTful HTTP和CORBA(通用对象请求代理体系结构),在过去很流行,但现在不那么流行了。
您还可以选择其他传输方式,例如HTTP,JMS,JBI,还可以选择前端API,例如JAX-RS和JAX-WS。Web服务开发有这么多种选择,因此需要一个开源服务框架来将所有上述选择粘合在一起,这就是Apache CXF所做的。
在本教程中,您将学习如何使用CXF通过上面列出的一个或多个选项来创建Web服务和使用该服务的客户端。本教程将引导您完成服务器和客户端的整个代码开发。由于每个应用程序只能使用每种类别中的一个选项,即前端,传输和协议,因此考虑到这三种的所有排列和组合,应用程序的数量将非常高。
本教程详细讨论了以下项目的开发-
- 具有普通旧Apache CXF对象(POJO)的CXF
- 带有JAX-WS的CXF
- 带有WSDL的CXF
- 带有JAX-RS的CXF
- 使用JMS的CXF
为了简单起见,我们使用了maven及其命令行界面。您可以使用首选的IDE创建Maven项目。
在下一章中,让我们从第一章开始。
带有POJO的Apache CXF
在本章中,您将学习如何开发一个简单的Web应用程序,该应用程序向用户发送问候消息。一个Web服务项目使用WSDL模型。CXF通过提供一个简单的前端来将Apache CXF API映射到基础WSDL,从而允许您隐藏此WSDL模型。
在这个最简单的项目中,Web服务的接口将直接向客户端公开,并且客户端将使用本机Apache CXF API来调用Web服务。
首先,我们将创建一个Web服务。每个服务都有一个公开给客户端的接口。我们可以将此接口编写为简单的Apache CXF接口或WSDL文档。在这种Apache CXF-First方法中,我们将通过Apache CXF接口公开我们的服务。
开发Web服务
我们将在Web上创建的服务将只有一个称为Greetings的Web方法。该方法采用字符串类型参数,我们将在其中发送用户名。该服务将向您发送回问候消息,消息中包含接收到的用户名。
Web服务界面
为了公开我们的Web服务的接口,我们将创建一个Apache CXF接口,如下所示:
//HelloWorld.java
package com.tutorialspoint.cxf.pojo;
public interface HelloWorld {
   String greetings(String text);
}该界面只有一种称为问候语的方法。服务器将实现此接口。在我们的琐碎应用程序中,此接口直接暴露给客户端。通常,在Web服务应用程序中,您使用WSDL描述Web服务界面。在这个简单的应用程序中,我们将提供此直接接口给客户端开发人员。然后,客户端将在服务器对象上调用问候消息。因此,首先让我们创建Web服务。
Web服务实施
所述的HelloWorld接口在实施HelloWorldImpl阿帕奇CXF类如下所示-
//HelloWorldImpl.java
package com.tutorialspoint.cxf.pojo;
public class HelloWorldImpl implements HelloWorld {
   @Override
   public String greetings(String text) {
      return "Hi " + text;
   }
}的问候方法接收的参数串类型,其附加到一个问候消息,并返回结果字符串到调用者。
接下来,我们编写服务器应用程序以承载HelloWorld服务。
创建服务器
服务器应用程序由两部分组成-
- 第一部分为我们的Web服务创建工厂,然后
- 第二部分编写了一个实例化它的主要方法。
服务器使用CXF库提供的ServerFactoryBean类将HelloWorld接口公开给远程客户端。因此,我们首先实例化ServerFactoryBean类,然后设置其各种属性-
ServerFactoryBean factory = new ServerFactoryBean();
我们通过在工厂对象上调用setServiceClass方法来设置要调用的服务类-
factory.setServiceClass(HelloWorld.class);
我们通过调用工厂的setAddress方法来设置用于调用服务的URL 。请注意,该服务将在此URL上发布。
factory.setAddress("http://localhost:5000/Hello");
在这种情况下,该服务将部署在嵌入式服务器上,并且将侦听端口5000。您可以选择任意端口号。
在创建工厂之前,您需要向工厂介绍我们的服务实现类。这是通过在工厂对象上调用setServiceBean方法来完成的,如下所示:
factory.setServiceBean(new HelloWorldImpl());
服务bean设置为我们的服务实现类的实例。最后,我们通过调用工厂的create方法来创建工厂-
factory.create();
现在,当我们已经开发了运行我们的Web服务的工厂时,接下来我们将编写一个main方法来实例化它并使其保持运行一段时间。
现在,编写一个main方法来实例化HelloServer类,如下所示:
public static void main(String[] args) throws Exception {
   new HelloServer();
   System.out.println("Listening on port 5000 ...");
}一旦实例化,HelloServer类将无限期运行。对于生产部署,您一定可以使服务器永远运行。在当前情况下,我们将在以下预定时间后终止服务器-
Thread.sleep(5 * 60 * 1000);
System.out.println("Server exiting ...");
System.exit(0);
下面给出了HelloServer类的完整代码-
//HelloServer.java
//HelloServer.java
package com.tutorialspoint.cxf.pojo;
import org.apache.cxf.frontend.ServerFactoryBean;
public class HelloServer {
   protected HelloServer() throws Exception {
      ServerFactoryBean factory = new ServerFactoryBean();
      factory.setServiceClass(HelloWorld.class);
      factory.setAddress("http://localhost:5000/Hello");
      factory.setServiceBean(new HelloWorldImpl());
      factory.create();
   }
   public static void main(String[] args) throws Exception {
      new HelloServer();
      System.out.println("Listening on port 5000 ...");
      Thread.sleep(5 * 60 * 1000);
      System.out.println("Server exiting ...");
      System.exit(0);
   }
}我们创建的服务器应用程序使用CXF库中的ServerFactoryBean类。现在,我们必须在我们的项目中包括这些库,以成功编译HelloServer类。我们将使用Maven设置项目依赖项。
设置Maven项目
要创建Maven项目,请在命令行窗口中键入以下命令。请注意,我们已经在Mac机器上对此进行了测试。对于Windows和Linux安装,说明可能在几个地方有所不同。
mvn archetype:generate
当询问属性时,输入以下值-
Define value for property 'groupId': : com.tutorialspoint
Define value for property 'artifactId': : cxf-pojo
Define value for property 'version': 1.0-SNAPSHOT: : 1.0
Define value for property 'package': com.tutorialspoint: : com.tutorialspoint.cxf.pojo
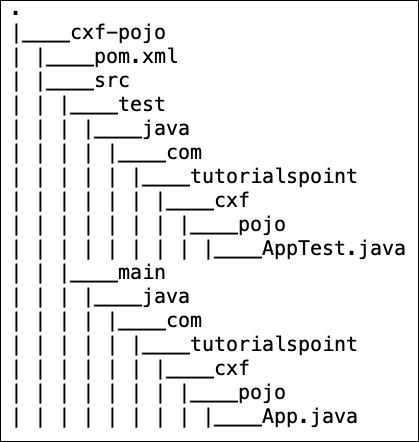
完成maven命令后,您将在当前文件夹中找到合适的文件夹结构以及pom.xml文件。
生成的目录结构如下所示:

您将在pom.xml中添加CXF依赖项,还将上述创建的Apache CXF文件复制到maven创建的结构的相应文件夹中。为了方便您参考,我们在下面为我们在计算机上创建的项目提供了pom.xml文件。
<?xml version = "1.0" encoding = "UTF-8"?>
<project xmlns = "http://maven.apache.org/POM/4.0.0" xmlns:xsi = "http://www.w3.org/2001/XMLSchema-instance" xsi:schemaLocation = "http://maven.apache.org/POM/4.0.0 http://maven.apache.org/xsd/maven-4.0.0.xsd">
   <modelVersion>4.0.0</modelVersion>
   <groupId>com.tutorialspoint</groupId>
   <artifactId>cxf-pojo</artifactId>
   <version>1.0</version>
   <packaging>jar</packaging>

   <profiles>
      <profile>
         <id>server</id>
         <build>
            <defaultGoal>test</defaultGoal>
            <plugins>
               <plugin>
                  <groupId>org.codehaus.mojo</groupId>
                  <artifactId>exec-maven-plugin</artifactId>
                  <executions>
                     <execution>
                        <phase>test</phase>
                        <goals>
                           <goal>java</goal>
                        </goals>
                        <configuration>
                           <mainClass>
                              com.tutorialspoint.cxf.pojo.HelloServer
                           </mainClass>
                        </configuration>
                     </execution>
                  </executions>
               </plugin>
            </plugins>
         </build>
      </profile>

      <profile>
         <id>client</id>
         <build>
            <defaultGoal>test</defaultGoal>
            <plugins>
               <plugin>
                  <groupId>org.codehaus.mojo</groupId>
                  <artifactId>exec-maven-plugin</artifactId>
                  <executions>
                     <execution>
                        <phase>test</phase>
                        <goals>
                           <goal>java</goal>
                        </goals>
                        <configuration>
                           <mainClass>
                           com.tutorialspoint.cxf.pojo.HelloClient
                           </mainClass>
                        </configuration>
                     </execution>
                  </executions>
               </plugin>
            </plugins>
         </build>
      </profile>
   </profiles>

   <dependencies>
      <dependency>
         <groupId>org.apache.cxf</groupId>
         <artifactId>cxf-rt-features-logging</artifactId>
         <version>3.3.0</version>
         <type>jar</type>
      </dependency>
      <dependency>
         <groupId>org.apache.cxf</groupId>
         <artifactId>cxf-rt-frontend-simple</artifactId>
         <version>3.3.0</version>
         <type>jar</type>
      </dependency>
      <dependency>
         <groupId>org.apache.cxf</groupId>
         <artifactId>cxf-rt-transports-http</artifactId>
         <version>3.3.0</version>
      </dependency>
      <dependency>
         <groupId>org.apache.cxf</groupId>
         <artifactId>cxf-rt-frontend-jaxws</artifactId>
         <version>3.3.0</version>
      </dependency>
      <!-- Jetty is needed if you're using the CXFServlet -->
      <dependency>
         <groupId>org.apache.cxf</groupId>
         <artifactId>cxf-rt-transports-http-jetty</artifactId>
         <version>3.3.0</version>
      </dependency>
   </dependencies>
   <properties>
      <project.build.sourceEncoding>UTF-8</project.build.sourceEncoding>
      <maven.compiler.source>1.8</maven.compiler.source>
      <maven.compiler.target>1.8</maven.compiler.target>
   </properties>
</project>
上面的pom.xml可能包含与该项目无关的其他依赖关系,但对于本教程中的下一个项目是必需的。无论如何,包括其他依赖项都没有任何危害。
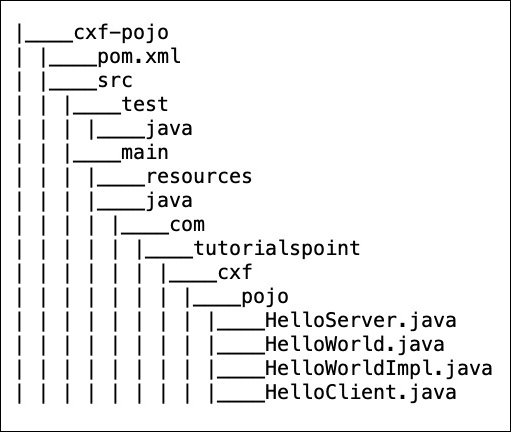
项目文件夹结构
下面显示了放置服务器和客户端Apache CXF文件后我机器上的项目文件夹结构,以供您快速参考:
正在运行的服务器
要构建项目,请在命令行窗口中使用以下命令:
mvn clean install
您可以使用以下命令启动服务器-
mvn -Pserver
这将启动服务器,您将在控制台上看到以下提示-
INFO: Creating Service {http://pojo.cxf.tutorialspoint.com/}HelloWorld from class com.tutorialspoint.cxf.pojo.HelloWorld
INFO: Setting the server's publish address to be http://localhost:5000/Hello
Listening on port 5000 ...
现在,在浏览器窗口中,指定我们已发布服务的URL。您将看到以下输出:
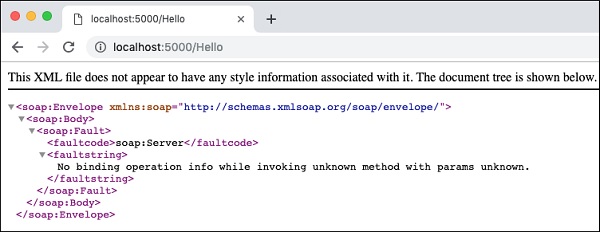
这确认我们的服务正在本地主机上的指定端口上运行。由于未在调用中指定问候消息,因此SOAP错误消息将返回到浏览器。
您可以使用所选的SOAP客户端进一步测试Web服务。在这里,我们使用Postman来测试我们的服务器。
输出如下所示:
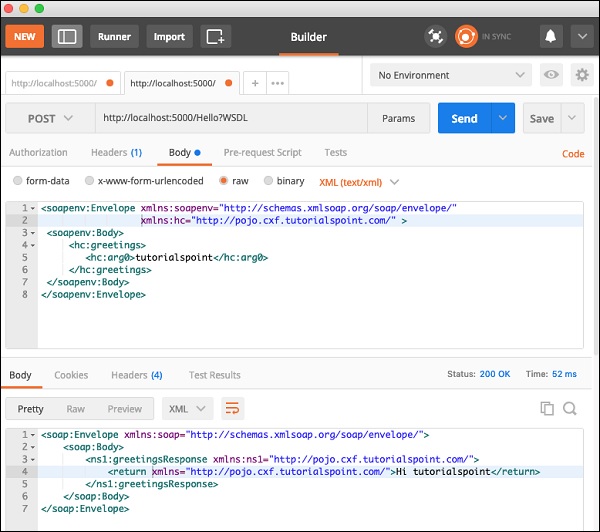
观察SOAP请求是手工编码的。发布请求后,服务器发送了SOAP响应消息,该消息显示在屏幕截图的底部。
由此,您可以了解CXF在请求和响应中都使用了SOAP协议,同时为您提供了当今世界上各种Web技术的统一视图。这大大简化了Web应用程序的开发。
我们的下一个任务是创建一个将使用您创建的Web服务的客户端。
创建客户
在服务器应用程序HelloWorld中,是暴露我们的Web服务的接口。Web服务本身仅向客户端提供简单的问候消息。通常,Web服务接口使用WSDL(Web服务描述语言)向外界公开。在这个简单的应用程序中,我们将通过直接公开服务接口(即HelloWorld.class)向客户端公开Web服务。
为此,CXF提供了一个名为ClientProxyFactoryBean的工厂类,该类允许我们将所需的接口连接到所创建的工厂实例。
首先,我们创建一个工厂bean实例,如下所示:
ClientProxyFactoryBean factory = new ClientProxyFactoryBean();
我们在工厂bean实例上调用setAddress方法来设置URL,通过该URL可以调用我们的Web服务。在我们的情况下,我们将使用在先前步骤中创建服务器时使用的URL-
factory.setAddress("http://localhost:5000/Hello");接下来,我们在工厂实例上调用create方法,将我们的服务接口HelloWorld.class附加到该方法。
HelloWorld helloServer = factory.create(HelloWorld.class);
最后,我们调用greetings方法来调用远程Web服务。
System.out.println(helloServer.greetings(System.getProperty("user.name")));这将在您的控制台上打印问候消息。
客户端应用程序的整个源如下所示-
//HelloClient.java
package com.tutorialspoint.cxf.pojo;
import org.apache.cxf.frontend.ClientProxyFactoryBean;
public class HelloClient {
   public static void main(String[] args) throws Exception {
      ClientProxyFactoryBean factory = new ClientProxyFactoryBean();
      factory.setAddress("http://localhost:5000/Hello");
      HelloWorld helloServer = factory.create(HelloWorld.class);
      System.out.println(helloServer.greetings(System.getProperty("user.name")));
   }
}
正在运行的客户端
确保服务器仍在您的计算机上运行。万一超时,请使用以下命令重新启动服务器-
mvn -Pserver
您将在控制台上看到以下消息-
Listening on port 5000 ...
现在,在我们设置为5分钟的服务器超时之前,打开另一个命令行窗口,并使用以下命令启动客户端-
mvn -Pclient
您将在命令行上看到类似于以下内容的消息-
Hi tutorialspoint
请注意,tutorialspoint是我们的用户名。您会以自己的名字问候。
在下一章中,我们将学习如何在JAX-WS(用于XML Web Services的Apache CXF API)项目中使用CXF。
下一篇我们讲述:带有JAX-WS的Apache CXF。
作者:terry,如若转载,请注明出处:https://www.web176.com/apachecxf/192.html
 支付宝
支付宝  微信
微信